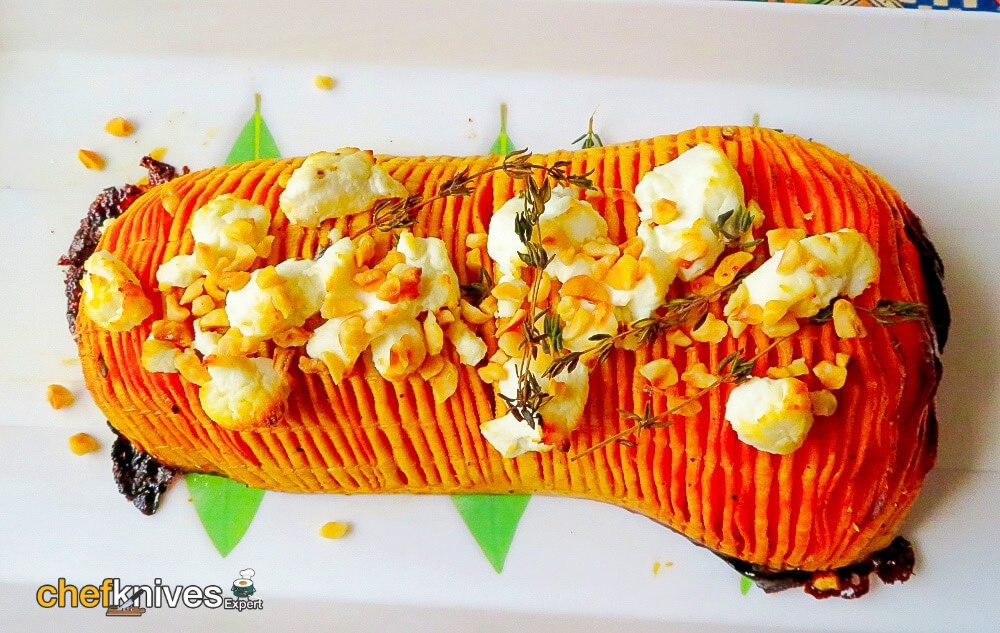
This fabulous Holiday Hasselback Butternut Squash will be a great hit with your vegan and vegetarian guests.
Have you ever invited someone over to share your holiday meal, and then discovered after you have issued the invitation, that they are a vegetarian, or vegan?
Are you looking for a side dish for this year’s Holiday meals that is not only stunning to look at, but a tad bit different than the ordinary and yet still delicious?
Look no further because I have a recipe to share with you today that covers all those bases! Hasselback Butternut Squash with Goat’s Cheese & Hazelnuts!
Not only is this dish fabulously easy to put together, but it is delicious and looks very attractive on the Holiday table.
It makes a fantastic main dish for the vegetarians in your life, or an excellent side dish for your carnivores. If you have vegans attending, you can simply switch out the goat’s cheese for a suitable vegan alternative.
Everybody’s happy!
Jump straight down to the short recipe!
Let’s Look at the Ingredients

Not only is this a very simple and fabulously tasty dish, but it also uses just a few ingredients and is very easy and quick to put together.
Butternut squash, pure maple syrup, a bit of oil, some fresh thyme, salt, pepper and soft goat’s cheese are all you need. That’s it. Easy peasy!
Squash Time!
How Do You Peel a Squash?

The hardest part of this will probably be peeling the squash. I like to use a y-shaped peeler for this. It does a fabulous job of gliding over all those butternut curves.
Not only does it make short work of the chore, but it takes off just the right amount of peel, no more and no less.
When you are cooking a Holiday dinner time, anything that can help to make things quicker and easier is a real plus with me!
How Do You Cut a Squash?

Once you have the squash peeled you will want to trim off both the stem end and the blossom ends. You also need to cut the squash in half.
Squash can be a bit dangerous to cut in half and somewhat challenging. Especially if they are extremely hard, or unusually shaped.
A well sharpened knife is key to this, but I have also always found that if I lay my squash on top of a clean tea towel on top of my cutting board, the tea towel helps to keep the squash in place.
No moving around or rolling. I think it’s just a lot safer.
Cleaning Out the Squash
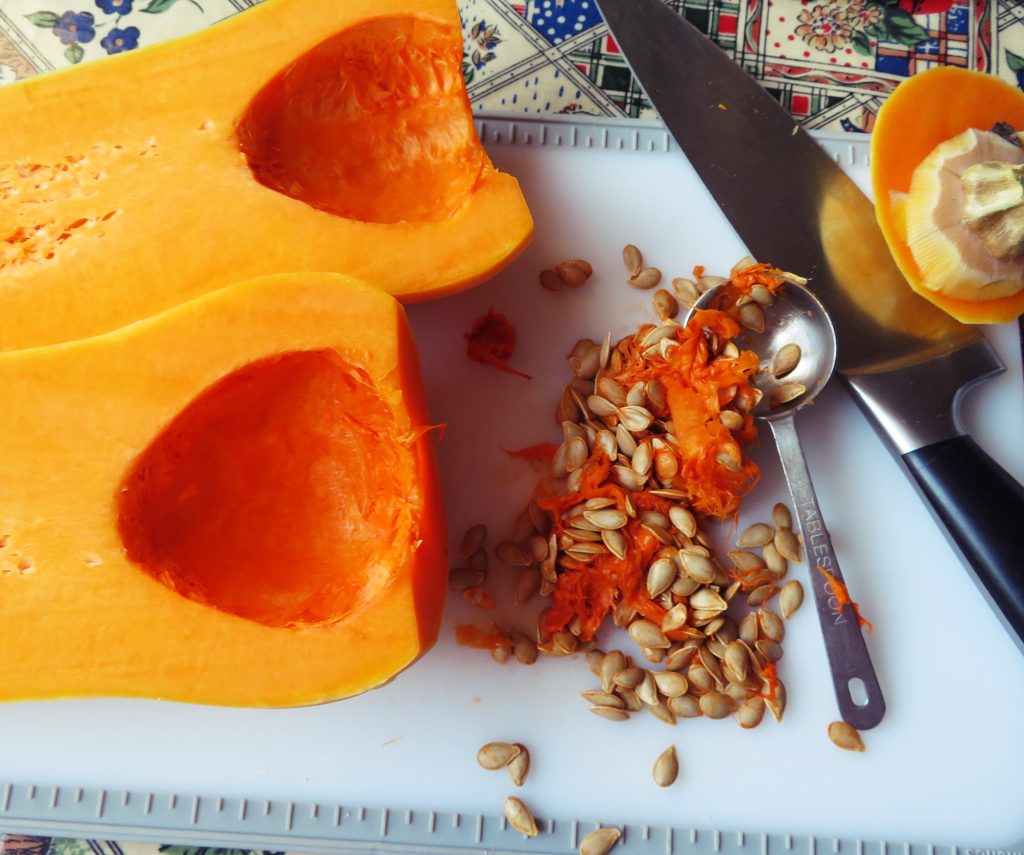
Once you have your squash cut in half you will need to remove the seeds and fibres at the bulbous end. I find that the easiest and quickest way to do this is to use either a melon baller, if you have one, or a metal tablespoon.
Both make a great job of it. You can discard the seeds or wash them, dry them, and save them for planting next year. This is my favourite thing to do with them!
Now comes the fiddly part, making the hasselback slashes down the length of the squash. However, it needn’t be overly difficult if you use my handy tips.
How to Cut Hasselback

When a vegetable is cut for a hasselback presentation (for instance those delectable potatoes, with their crispy edges and buttery finish) you need to make cuts down through the vegetable at ¼ inch intervals along the whole length of the vegetable.
Somehow you need to prevent yourself from cutting all the way down through to the bottom, thereby cutting your vegetable into pieces. You want your vegetable to stay intact, maintaining the integrity of its shape.
I find that a pair of chopsticks is the perfect tool for making sure that you don’t accidentally cut the vegetable into bits!
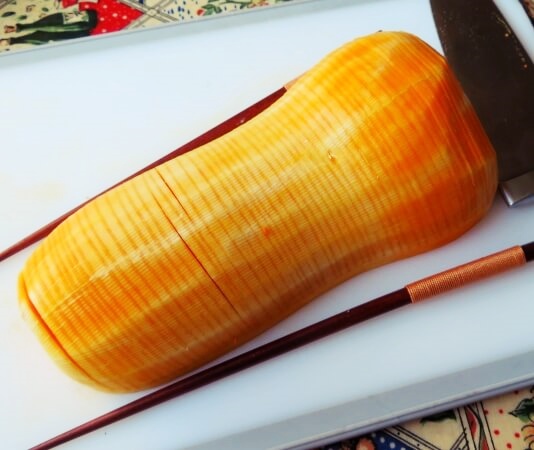
I lay one chopstick on either side of the vegetable.
In the case of a butternut squash, the bulbous end will be a bit more precarious to cut the slits in, due to its hollow nature, so I place the thickest end of the chopsticks at that end of the squash.
Then I proceed to simply make my cuts down the length of the squash. Its quick, it’s easy and I always end up with a perfect finish!
Voila!
Getting Everything Ready to Bake

Once you have your squash all peeled, sliced, etc. simply place them onto a baking sheet that you have lined with baking parchment. It is then that the real magic happens.
On to Baking

Once you have done this, its time to lay some fresh thyme sprigs over top of the squash and pop the whole thing into the oven, where it will bake for about an hour and a quarter.
Your squash should be well on its way to being tender by that time and starting to smell really amazing!
Chef’s Note!
Another great thing about this fantastic recipe is that you can do everything to get it all ready, right up to the point of brushing it with the maple mixture and baking it, well ahead of time. This also helps to turn it into a great option for your Holiday Dinner. Anything that can save me time on the day is a real plus with me. Simply prep the squash, cover and refrigerate overnight until you are ready to brush the maple mixture on and pop it into the preheated oven
Ready to Plate

Just long enough to gild that tangy goat’s cheese and toast those crunchy nuts! Doesn’t that look beautiful?
Just look at those tender, lightly caramelized edges and that unctuously golden cheese. I think it tantalizingly delicious, and amazingly tasty!
Be prepared to stand back and enjoy more than a few pats on the back as I am sure your guests will be totally impressed with this spectacular side dish.
I call this a winning combination and a side dish well worthy of serving to family and guests alike!
Happy Holidays!

HASSELBACK BUTTERNUT SQUASH: Short Recipe
Serves: 2 – 3 (as a main course) or 6 – 8 (as a side)
Deliciously tender butternut squash roasted until golden and tender and garnished with goats’ cheese and toasted chopped hazelnuts.
This makes a fabulous vegetarian main for any holiday dinner, or a spectacular side for others. You can easily make it vegan by using a feta-style non-dairy alternative to the goat’s cheese.
Ingredients
- 1 large butternut squash
- 1 tbsp olive oil
- 1 tbsp pure maple syrup
- Several sprigs of fresh thyme
- 3 ounces soft goat cheese, crumbled
- 1 tbsp chopped roasted hazelnuts
- Fine sea salt and coarsely ground black pepper (to taste)

Instructions
- Preheat the oven to 375°F. Have ready a baking tray which you have lined with baking parchment.
- Peel the butternut squash using a vegetable peeler.
- Halve the squash lengthwise and then scoop out and discard any seeds.
- Place one half squash cut side down on a cutting board. Place a chopstick on either side of the squash, with the thicker end of each chopstick at the bulbous hollowed end of the squash. (The purpose of the chopsticks is to help prevent you from cutting all the way through.)
- Make slices across the squash at ¼ inch intervals all along the length of the squash, taking care not to cut through to the bottom. You want the squash to stay intact.
- Place the prepared squash onto the lined baking sheet and repeat with the other half.
- Whisk together the olive oil, maple syrup and seasoning.
- Using a pastry brush, brush this mixture all over the squash halves equally, pushing some of it down in between the cuts as much as you can without breaking them apart.
- Lay several springs of fresh thyme over top of each squash.
- Roast in the preheated oven for 1 hour 15 minutes to 1 hours 30 minutes, until the squash is tender but not falling apart. (The tip of a sharp knife should insert easily into the thickest part of the squash.
- Sprinkle with the crumbled cheese and hazelnuts.
- Return to the oven for a further 15 minutes.
- Transfer to a heated serving platter to serve.
Enjoy!

Check out some of my other recipes:
